
بکاپ کامل از سایت وردپرس
اگر طراح سایت هستید و یا مدیریت یک کسبوکار اینترنتی را برعهده دارید قطعا مهمترین سرمایه شما، سایتتتان است. به همین خاطر شما باید به خوبی از این سرمایه و اعتبار ارزشمند، محافظت کنید. از سوی دیگر قطعا بارها شنیدهاید که پیشگیری بهتر از درمان است پس حتما باید پیش از آنکه برای کسبوکارتان اتفاقی پیش بیاید راههای پیشگیری را مدنظر قرار دهید. یکی از مهمترین راههای محافظت و افزایش امنیت سایت، تهیه پشتیبان یا بکاپ کامل از سایت وردپرسی شما میباشد. ما در این مقاله چگونگی تهیه فول بکاپ در سی پنل و همچنین از طریق افزونه را به شما آموزش خواهیم داد. پس با ما تا انتهای این مقاله همراه باشید.
بکاپ کامل از سایت وردپرس
آنچه به اختصار در این مقاله خواهید خواند:
- بخش اول:تهیه فول بکاپ در سی پنل
- بخش دوم:بازگردانی فایلهای بکاپ در سی پنل
- بخش سوم:نحوه گرفتن بکاپ کامل از سایت وردپرس به کمک افزونه
بخش اول: تهیه فول بکاپ در سی پنل
تهیه فول بکاپ به روش دستی
1. تهیه پشتیبان از پوشه public_html
سی پنل یکی از محبوبترین پنلهای مدیریت هاست میباشد که تهیه فایل پشتیبان یا اصطلاحا فوق بکاپ از طریق آن به راحتی صورت میگیرد.
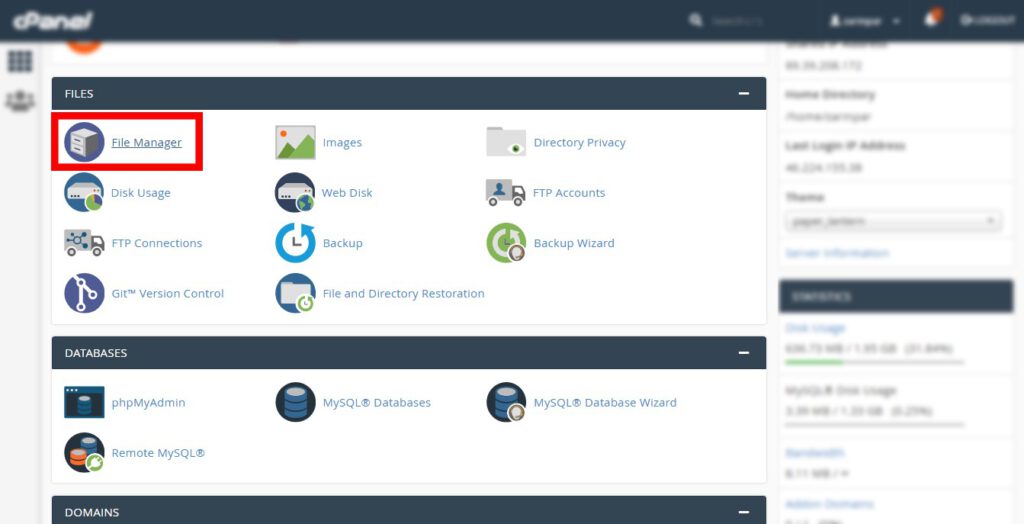
برای انجام اینکار به پنل مدیریتی سی پنل خود مراجعه کنید در آنجا مطابق شکل زیر بر روی گزینه “File Manager” کلیک نمایید.
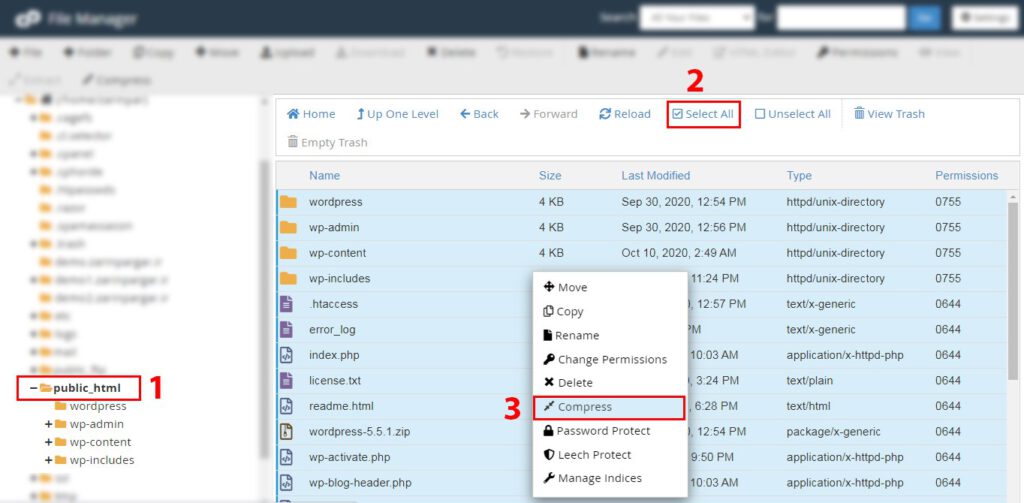
مطابق شکل زیر در گام اول در سمت چپ صفحه فایل “public_html” را انتخاب کنید. در گام دوم بر روی گزینه “Select All” کلیک نمایید تا همه فایلهای سایت شما انتخاب شوند. در نهایت در گام سوم، بر روی فایلهای انتخاب شده راست کلیک نمایید و “compress” را بزنید تا همه فایلهای انتخاب شده در یک فایل zip فشردهسازی شوند.
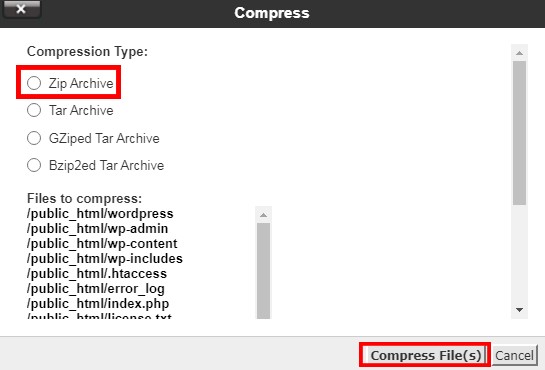
با کلیک بر روی فشرده سازی(comprees) پنجرهای مطابق شکل زیر باز میشود. که در این پنجره ابتدا فرمت zip را انتخاب کرده و بر روی گزینه Compress Files کلیک کنید.
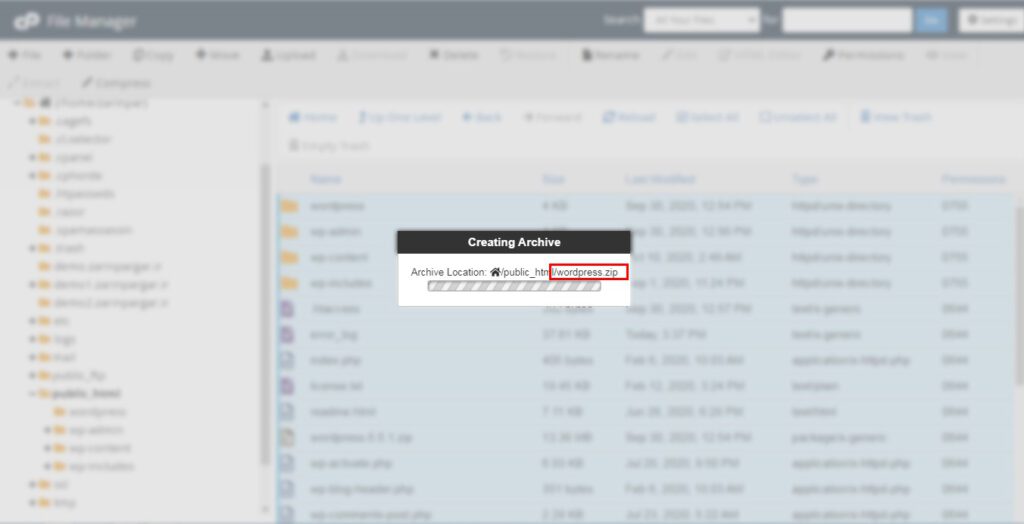
حال مطابق تصویر فایلهای شما با نام wordpress ( و یا هرنامی که شما هنگام فشرده سازی تعیین نمایید) درحال فشرده شدن است.
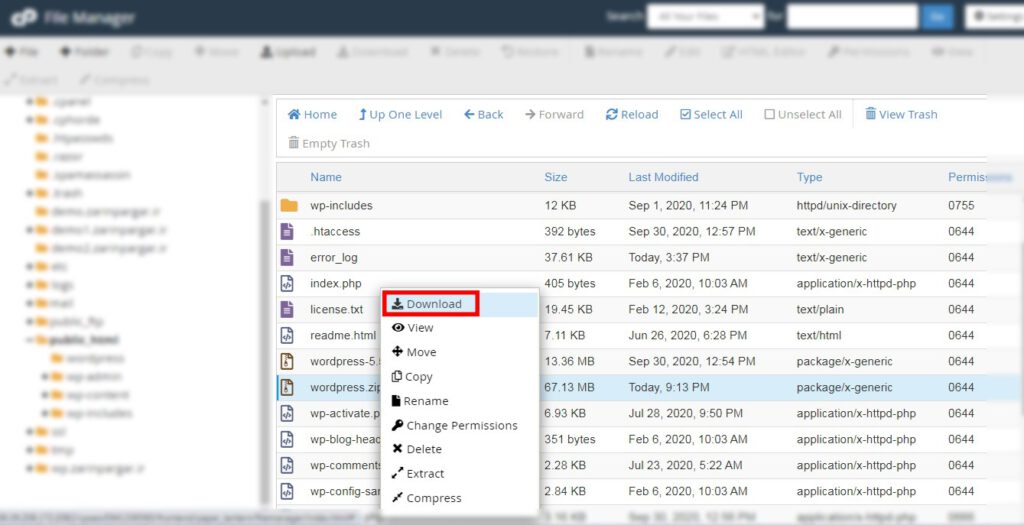
سپس بعد از فشردهسازی باید مطابق آنچه که در شکل زیر میبینید فایل zip را دانلود نمایید.
برای دانلود بر روی فایل کلیک راست نمایید و گزینه “Download” را بزنید تا بارگیری فایل zip شروع شود. با اندکی صبر فرآیند بارگیری تمام خواهد شد و این فایل در کامپیوتر شما ذخیره خواهد شد.
بدین صورت شما توانستید از تمامی فایلهای خود(شامل افزونهها، قالبها و…) یک نسخه کامل پشتیبان تهیه نمایید.
حال وقت آن میرسد که از دیتابیستان نیز یک نسخه پشتیبان تهیه نمایید تا تهیه فول بکاپ در سی پنل شما با داشتن یک فایل zip از پوشه public_html و یک فایل هم از دیتابیس، کامل شود.
2. تهیه پشتیان از دیتابیس
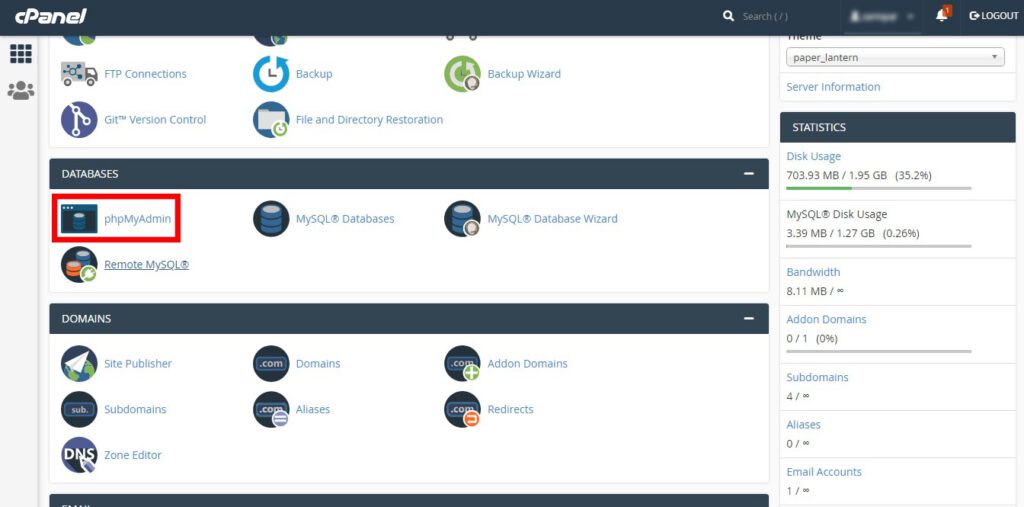
به پنل مدیریتی سی پنل خود باز گردید و در قسمت DATABASES بر روی گزینه phpMyadmin کلیک نمایید.
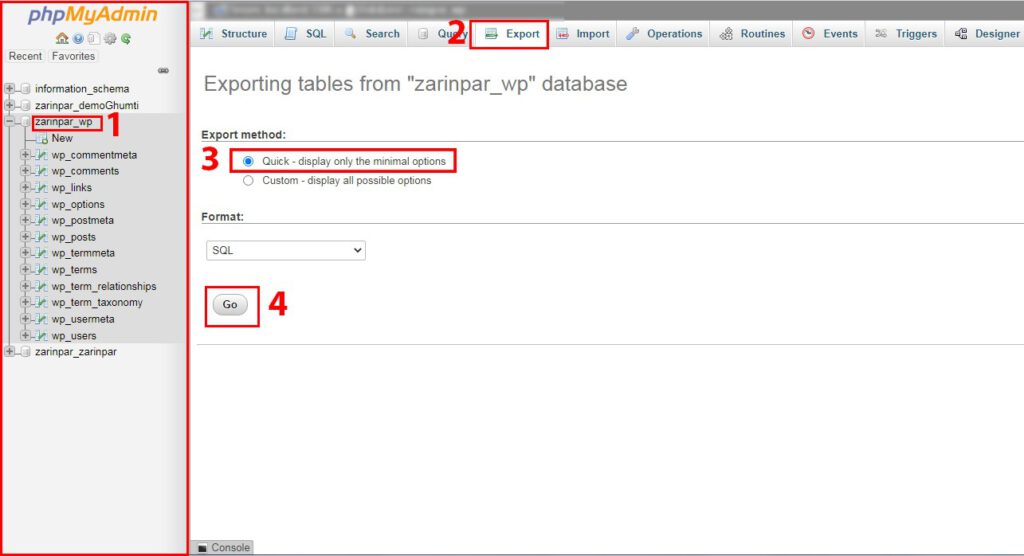
حال در صفحهای که باز میشود در سمت چپ صفحه بر روی دیتابیس مدنظرتان که سایت بر روی آن قرار دارد کلیک کنید. در گام بعدی باید بر روی دکمه Export کلیک نمایید و سپس گزینه “Go” را بزنید تا فرآیند برونبری و دانلود پوشه دیتابیس آغاز گردد.
با انجام این دو مرحله یعنی تهیه نسخه پشتیبان از public_html و دیتابیس، شما توانسید بکاپ کامل از سایت وردپرس خود به صورت دستی تهیه نمایید.
تهیه فول یک آپ از طریق ویزارد cpanel
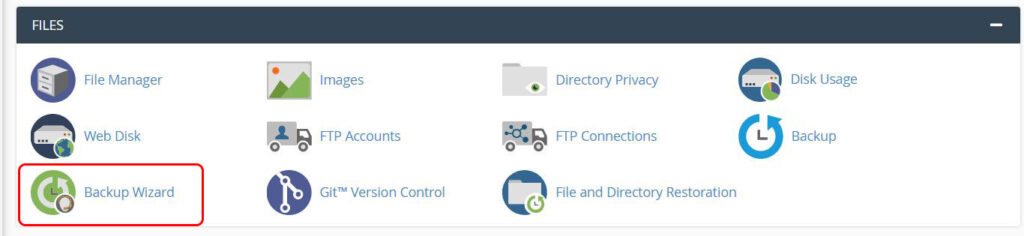
روش دیگری هم برای بک آپ گرفتن از طریق Cpanel وجود دارد و به این شکل است که بک آپ از دیتابیس و فایلها باهم انجام میشود. برای این کار وارد cpanel شوید و در قسمت FILES بر روی Bachup Wizard کلیک کنید.
در این صفحه بر روی دکمه آبی رنگ Back Up کلیک کنید تا به مرحله بعدی بروید.

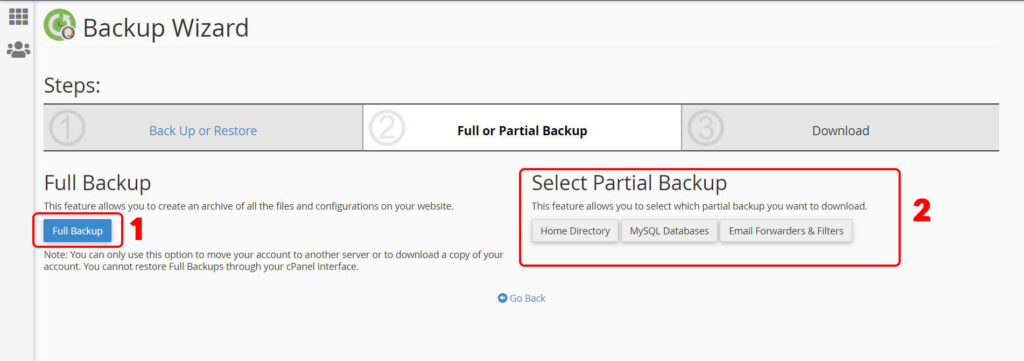
در تصویر پایین در بخش 1 دکمه Full Backup وجود دارد و برای تهیه فول بکاپ در سی پنل میتوانید از این دکمه استفاده نمایید. در بخش 2 این امکان به شما داده میشود که فایلها، دیتابیس و ایمیلها را جداگانه بک آپ بگیرید.
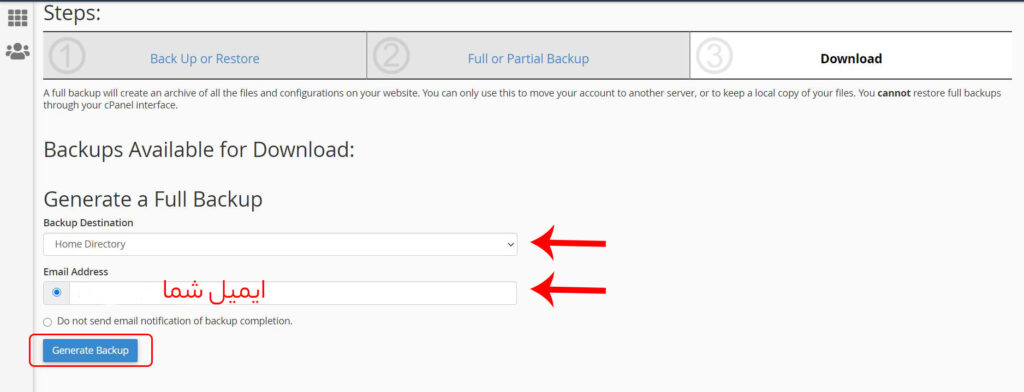
حال ما روی دکمه Full Backup کلیک میکنیم و در این مرحله محل ذخیره شدن فایل بکاپ را تعیین خواهیم کرد. اگر دوست داشتید که بعد از تکمیل کار برای شما ایمیل ارسال شود تیک گزینه ایمیل را فعال کنید؛ در غیر این صورت گزینه Do not send email notification of backup completion. را انتخاب نمایید.
در آخر میتوانید فایل بک آپ خود را دانلود نمایید.
بازگردانی فایلهای بکاپ در سی پنل
اما برای یادگیری نحوه بازگردانی این بکاپ گرفته شده در زمان مورد نیاز، کافیست مراحل زیر انجام دهید.
بازگردانی فایلهای بک آپ به صورت دستی
1. بازگردانی فایلهای پوشه public_html
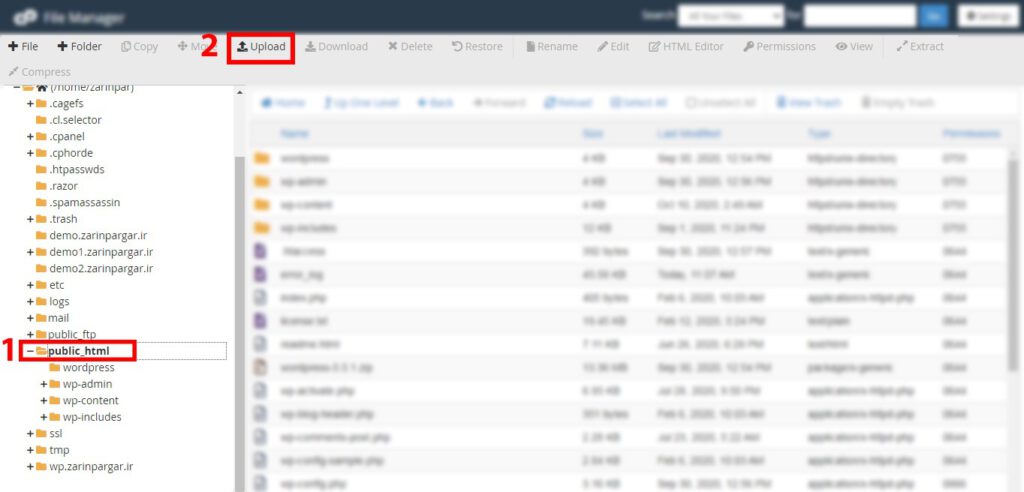
ابتدا به هاست سی پنل خود بروید و بر روی File Manager کلیک نمایید. سپس مانند شکل زیر بر روی پوشه public_html کلیک کرده و گزینه Upload در بالا صفحه را بزنید.
توجه: بهتر است برای آنکه آپلود فایلها به درستی انجام شود ابتدا تمام فایلهای داخل پوشه public_html را پاک کنید تا این پوشه کاملا خالی باشد.
بعد از زدن دکمه Upload پنجرهای مطابق شکل زیر برای شما باز میشود که در آنجا باید با زدن دکمه Select File فایلی که در مرحله اول بخش قبل (فایلهای پوشه public_html) که به صورت فایل zip دانلود کرده بودید را آپلود کنید.
بعد از آپلود کردن فایل zip بکاپ، روی آن راست کلیک کرده و با زدن گزینه Extract آن را از حالت فشرده خارج کنید.
بدین صورت شما توانستید فایلهای پوشه public_html را مجددا در سایت خود بارگذاری کنید.
2. بازگردانی فایلهای دیتابیس
الف) ساخت دیتابیس
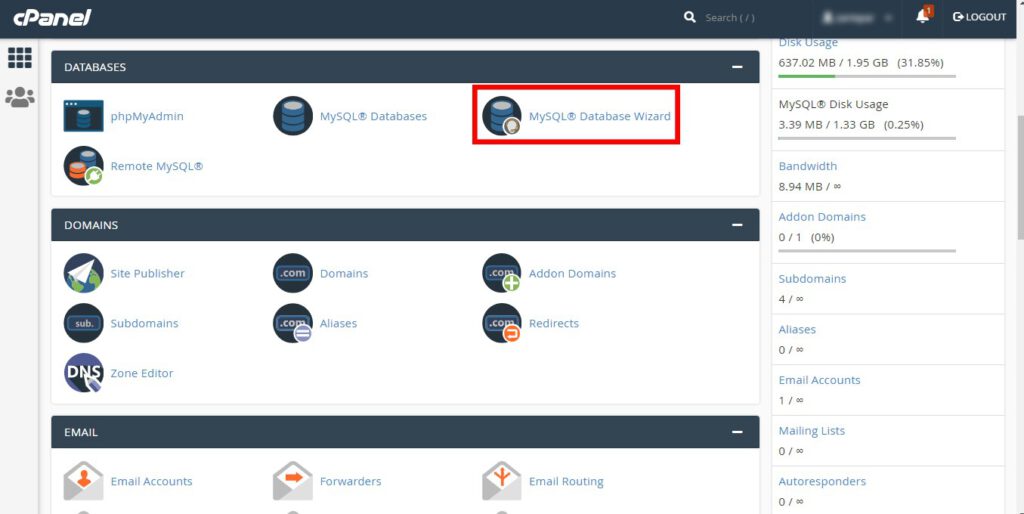
به پیشخوان مدیریت سی پنل بروید و مطابق شکل زیر، در آنجا بر روی گزینهی MySQL Database Wizard کلیک نمایید.
سپس نام دیتابیس مورنظر خود را وارد نمایید.(بهتر است که نام دیتابیس قبلی خود را که از آن بکاپ گرفتهای وارد نمایید) سپس دکمه Next Step را بزنید

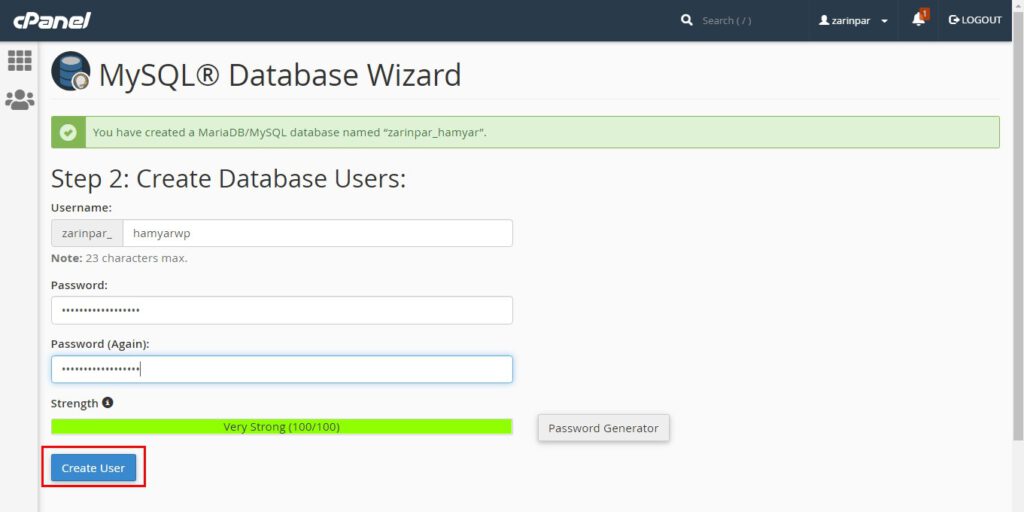
در صفحه بعدی باید نام کاربری و یک پسورد قوی برای دیتابیستان انتخاب کنید. سپس مطابق شکل زیر بر روی دکمه Create User کلیک کنید.
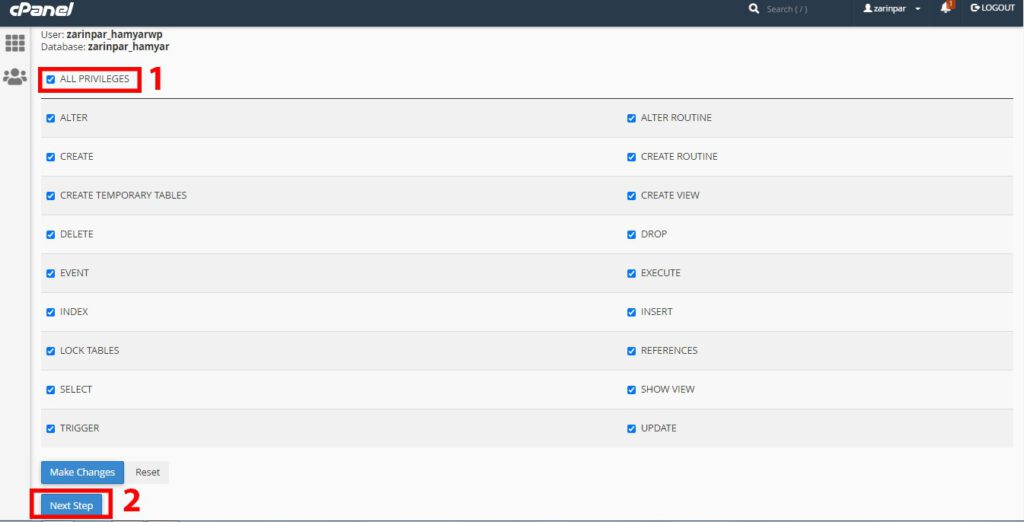
بعد از آن در پنجره بعدی تیک گزینه ALL PRIVILEGES را بزنید و دکمه Next Step را کلیک نمایید.
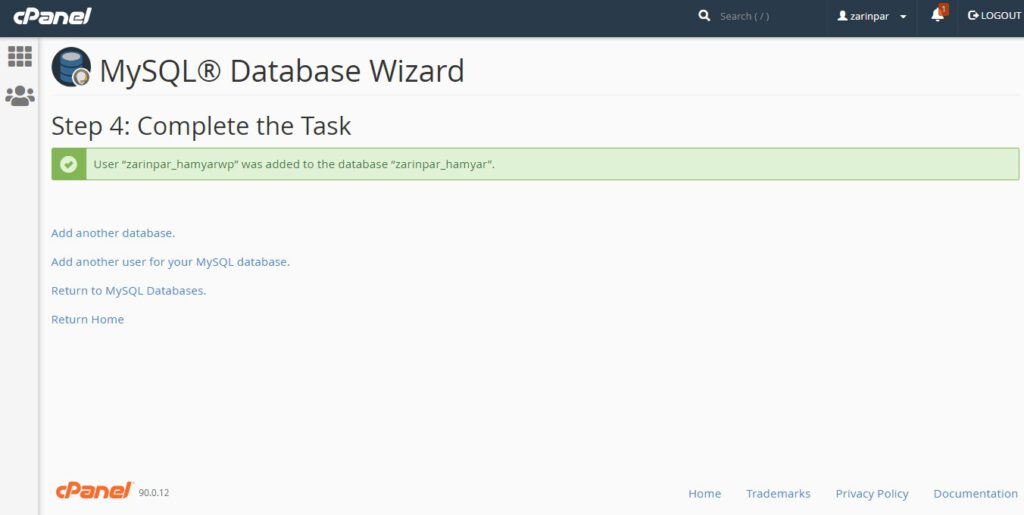
در نهایت با صفحهای مطابق شکل زیر مواجه میشوید که نشاندهنده این است که پایگاه داده(دیتابیس) شما به درستی ساخته شده است.
ب) بازگردانی فایلهای دیتابیس
بعد از آنکه فضایی برای بارگذاری فایلهای دیتابیس ایجاد کردید و دیتابیس را ساختید حال باید فایلهای دیتابیس دانلود شده در بخش اول را بارگذاری یا اصطلاحا درونریزی کنید.
برای انجام اینکار مطابق شکل زیر، به قسمت phpMyAdmin پیشخوان مدیریت سی پنل خود بروید.
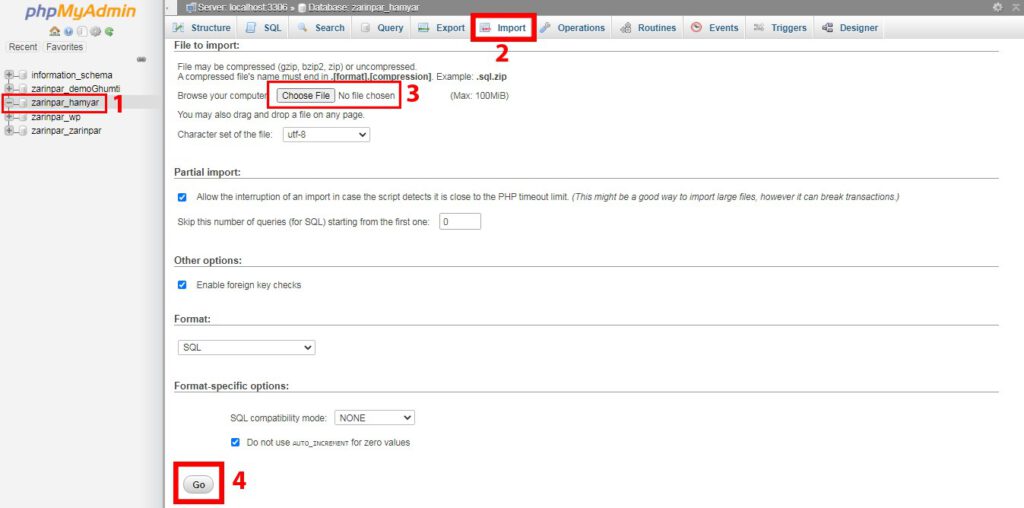
مطابق شکل زیر، ابتدا بر روی دیتابیسی که در گام قبلی ساختید کلیک نمایید. بعد از آن در قسمت نوار ابزار دکمه Import را بزنید. سپس در قسمت File to import بر روی گزینه Choose File کلیک نمایید تا بدین صورت بتوانید فایل دیتابیسی که در بخش اول دانلود کرده بودید را درونریزی کنید. درنهایت برای بارگذاری فایل دیتابیس بر روی دکمه Go بزنید.
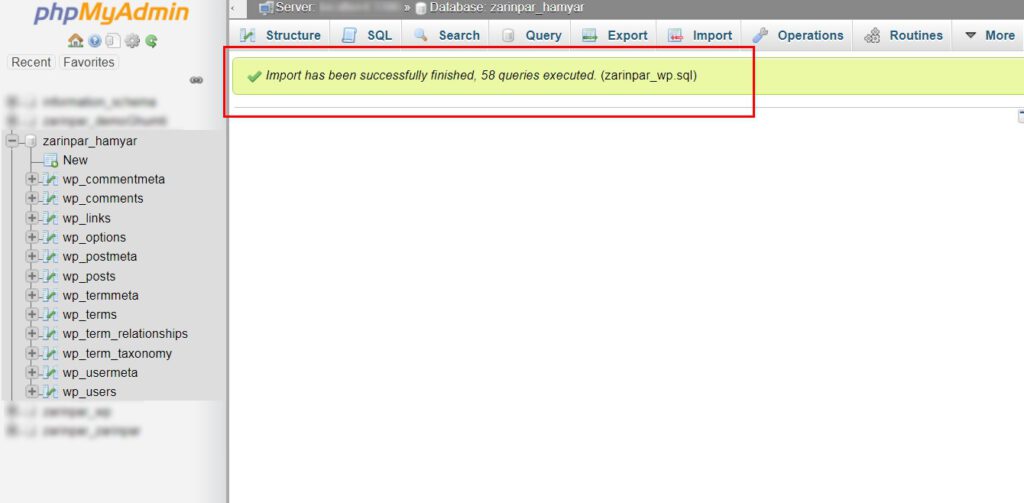
اگر تمامی مراحل را براساس آنچه که گفته شد به درستی انجام داده باشید با پیامی مطابق شکل زیر مواجه خواهید شد.
بازگردانی یک آپ از طریق ویزارد cpanel
برای این کار، نخست وارد cpanel شوید و در قسمت FILES بر روی Bachup Wizard کلیک کنید.
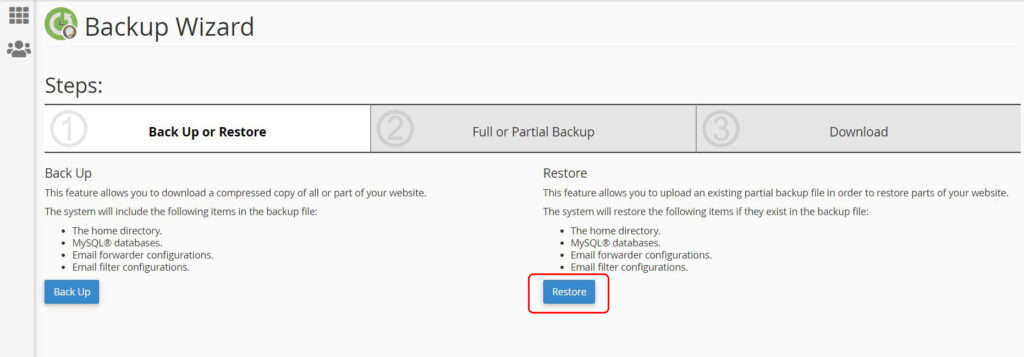
در صفحه باز شده بر روی دکمه Restore کلیک کنید.
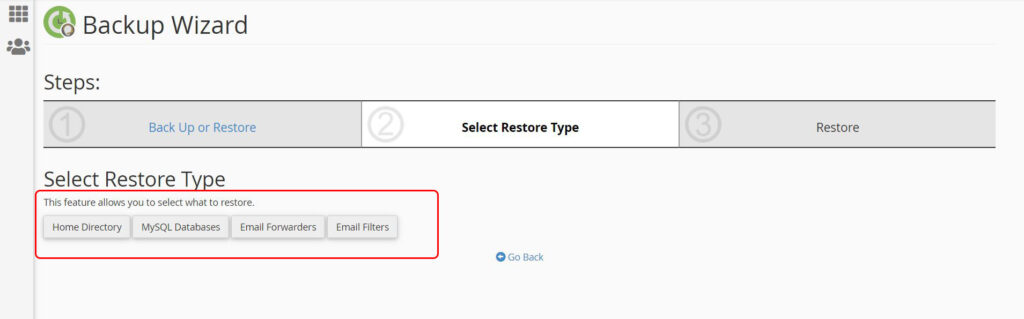
حال باید انتخاب کنید که قصد بازگردانی کدام بخش از سایت را دارید. اگر بر روی Home directory کلیک کنید، فایلهای موجود در file manager، اگر بر روی MySQL Database کلیک کنید جداول دیتابیس واگر بر روی دو دکمه Emailکلیک کنید، ایمیلهای شما بازگردانی خواهند شد.
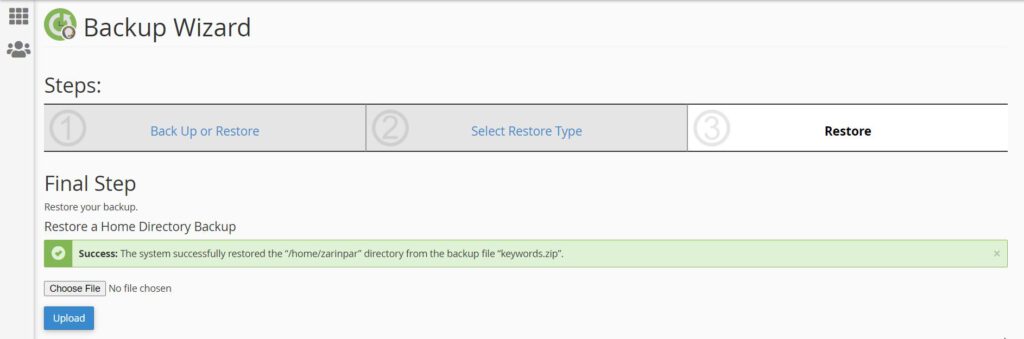
در مرحله بعد با کلیک بر روی گزینه choose file میتوانید فایل بک آپ خود را برای بازگردانی انتخاب نمایید و سپس بر روی Upload کلیک کنید تا عملیات کامل شود.
بخش سوم: نحوه گرفتن بکاپ کامل از سایت وردپرس به کمک افزونه
در این بخش به شما افزونههایی معرفی خواهیم کرد تا به کمک آنها قادر به تهیه بکاپ کامل از سایت وردپرس خود باشید.
- افزونه UpDrafts
این افزونه یکی از محبوبترین افزونههای تهیه بکاپ کامل از سایتهای وردپرسی است که دارای بیش از 3 میلیون نصب فعال در مخرن وردپرس بوده و برای نسخه وردپرس 3.2 و بالاتر مناسب است. برای آشنایی با ویژگیهای این افزونه و چگونگی بکاپ گیری کامل به کمک آن به این مقاله مراجعه نمایید.
- افزونه WP DB Backup
افزونه WP DB Backup صرفا برای تهیه نسخه پشتیبان از پایگاه داده(دیتابیس) مورد استفاده قرار میگیرد و به کمک آن میتوانید نحوه بکاپ گیری از دیتابیس را به صورت شخصیسازی شده انجام دهید. برای آشنایی با این افزونه و نحوه گرفتن نسخه پشتیبان از سایت به این مقاله مراجعه نمایید
- افزونه Dupliucator
افزونه Dupliucator یک ابزار فوقالعاده برای انتقال سایت از لوکال هاست به هاست اصلی و همچنین بکاپ گیری میباشد.
برای نحوه چگونگی بکاپ گیری به کمک این افزونه و افزونههای مشابه آن به این مقاله مراجعه نمایید.
منبع: همیار وردپرس
Teaching in English
Full tutorial on how to backup and restore backup in WordPress
Full backup of the WordPress site
If you are a website designer or manage an internet business, your most important asset is definitely your website. Therefore, you should protect this valuable capital and credit well. On the other hand, you have definitely heard many times that prevention is better than cure, so you should definitely consider preventive measures before something happens to your business. One of the most important ways to protect and increase the security of your site is to make a full backup of your WordPress site. In this article, we will teach you how to make a full backup in cPanel and also through the plugin. So stay with us until the end of this article.
Full backup of the WordPress site
What you will read in brief in this article:
First part: making a full backup in cPanel
Second part: Restoring backup files in cPanel
The third part: How to take a complete backup of the WordPress site with the help of the plugin
First part: Making a full backup in cPanel
Preparation of full backup manually
Backup the public_html folder
CPanel is one of the most popular hosting management panels, through which you can easily create a backup file.
To do this, go to your CPanel management panel and click on the “File Manager” option as shown below.
According to the figure below, in the first step, select the “public_html” file on the left side of the page. In the second step, click on the “Select All” option to select all the files on your site. Finally, in the third step, right-click on the selected files and press “compress” so that all the selected files are compressed in a zip file.
By clicking on compression, a window will open as shown below. In this window, first select the zip format and click on the Compress Files option.
Now, according to the image, your files are being compressed with the wordpress name (or whatever name you specify during compression).
Then, after compression, you should download the zip file as shown in the figure below.
To download, right click on the file and click “Download” to start downloading the zip file. With a little patience, the download process will be finished and this file will be saved in your computer.
In this way, you were able to make a complete backup of all your files (including plugins, templates, etc.).
Now it’s time to make a backup copy of your database to complete the full backup in your cPanel with a zip file from the public_html folder and a file from the database.
Preparation of backups from the database
Return to your cPanel management panel and click on the phpMyadmin option in the DATABASES section.
Now, on the page that opens, on the left side of the page, click on the desired database on which the site is located. In the next step, you must click on the Export button and then click “Go” to start the process of exporting and downloading the database folder.
By performing these two steps, i.e. making a backup copy of public_html and database, you can make a full backup of your WordPress site manually.
Preparation of full one-up through cpanel wizard
There is another way to make a backup through Cpanel, and it is in this way that the database and files are backed up together. For this, enter cpanel and click on Bachup Wizard in the FILES section.
در این صفحه بر روی دکمه آبی رنگ Back Up کلیک کنید تا به مرحله بعدی بروید.
In the picture below, in section 1, there is a Full Backup button, and you can use this button to make a full backup in cPanel. In part 2, you will be given the possibility to back up files, database and emails separately.
Now we click on the Full Backup button and in this step we will determine the location of the backup file. If you would like an email to be sent to you after completing the work, activate the email option tick; Otherwise, the Do not send email notification of backup completion option. select
Finally, you can download your backup file.
Restoring backup files in cPanel
But to learn how to restore this backup when you need it, just follow the steps below.
Restore backup files manually
Restore the public_html folder files
First, go to your cPanel host and click on File Manager. Then click on the public_html folder as shown below and click the Upload option at the top of the page.
Note: It is better to first delete all the files inside the public_html folder so that this folder is completely empty so that the files can be uploaded correctly.
After clicking the Upload button, a window as shown below will open for you, where you have to click the Select File button to upload the file that you downloaded in the first step of the previous section (files of the public_html folder) as a zip file.
After uploading the backup zip file, right click on it and extract it by pressing the Extract option.
In this way, you were able to re-upload the public_html folder files on your site.
Restoring database files
A) Creating a database
Go to the CPanel management counter and click on the MySQL Database Wizard option as shown below.
Then enter the name of your desired database
(It is better to enter the name of your previous database from which you took a backup) then click the Next Step button
On the next page, you must choose a username and a strong password for the database. Then click the Create User button as shown below.
After that, in the next window, tick the ALL PRIVILEGES option and click the Next Step button.
Finally, you will see a page as shown below, which indicates that your database has been created correctly.
b) Restoring database files
After you have created a space to load the database files and created the database, now you have to load or import the database files downloaded in the first part.
To do this, go to the phpMyAdmin section of your cPanel management counter as shown below.
According to the figure below, first click on the database you created in the previous step. After that, click the Import button in the toolbar. Then, in the File to import section, click on the Choose File option so that you can import the database file that you downloaded in the first section. Finally, click the Go button to load the database file.
If you have done all the steps based on what was said correctly, you will see a message as shown below.
Restoring an app through the cpanel wizard
To do this, first enter cpanel and click on Bachup Wizard in the FILES section.
On the opened page, click on the Restore button.
Now you have to choose which part of the site you want to restore. If you click on the Home directory, the files in the file manager, if you click on the MySQL Database, the database tables, and if you click on the two Email buttons, your emails will be restored.
In the next step, by clicking on the choose file option, you can choose your backup file to restore and then click on Upload to complete the operation.
The third part: How to take a complete backup of the WordPress site with the help of the plugin
In this section, we will introduce plugins to help you make a complete backup of your WordPress site.
UpDrafts plugin
This plugin is one of the most popular plugins for making a full backup of WordPress sites, which has more than 3 million active installations in WordPress and is suitable for WordPress version 3.2 and above. To learn about the features of this plugin and how to make a complete backup with its help, refer to this article.
WP DB Backup plugin
The WP DB Backup plugin is used only to make a backup copy of the database (database) and with the help of it you can do the backup of the database in a personalized way. To learn about this plugin and how to take a backup copy of the site, refer to this article
Dupliucator plugin
The Dupliucator plugin is a wonderful tool for transferring the site from the local host to the main host and also for backup.